Friday, May 27, 2011

Tutorial & GIVEAWAY: Fabric Business Card Holder


I started a business.  I got the business cards.  I got the t-shirt (not really on the t-shirt - although Vistaprint likes to send me three emails a week offering me things like t-shirts since I'm a VIP now that I've made ONE purchase there - le sigh)...  After working really hard to design my own business cards and ordering a ton of them, I forget to carry them with me anywhere.  Anyone else do this?  I decided the best way to remedy this problem is to make a business card holder to attach to my keys.

My mother-in-law and sister-in-law both recently graduated (my mother-in-law received her masters degree), and I wanted to make them business card holders, too, to encourage them in their new careers.  So I made them these fun little wallets (adding a ribbon loop for a keyring):


and some bookmarks (which I forgot to take pictures of) from 7 Layer Studio (I must warn those of you clicking in public or at the office that there is music on her blog).  Shelley Dutton, the artist behind 7 Layer Studio, has some really cute free tutorials, and I love that she also crafts with a purpose.  She supports One Heart Bulgaria, "a non-profit humanitarian organization dedicated to improving the quality of life for Bulgarian orphans."

The mini-wallets turned out cute, but I was really looking for something a little smaller and simpler solely for the purpose of holding business cards.  I found lots of free patterns including the 7 Layer Studio one on Tipnut, but I couldn't find any that were exactly what I was looking for:

  • As small and trim as possible while still able to hold a lot of cards.
  • Two pockets that open in the same direction.  I dislike how ones with two pockets facing the inside crease from different directions can lead to things falling out from the top pocket when open for this klutz. 
  • Loop for my key ring
  • No elastic closure - I tend to break them, and no velcro closure - I catch them on everything and get them smothered in lint.
  • No hand-sewing required.  :)
So I decided to create my own pattern which I am now going to share with you! Please give me grace as this is the first sewing pattern and tutorial I have ever created (feedback would be appreciated, and I'd love to see your finished creations). Also, please remember that this tutorial is for personal use only (you may not sell the pattern or finished goods using the pattern).  If you would like your own business card holder but don't want to make it yourself, please let me know as I'm planning on listing a few in the shop in the near future.  Thanks!

Materials:

  • 5"x6 7/8" piece of fabric for the outer body
  • 5"x6 7/8" piece of fabric for the inner body
  • One 5"x4 1/4" piece of fabric for the top pocket
  • One 4.5"x6 3/8" piece of heavy weight fusible interfacing
  • Ribbon for key ring loop
  • Snaps to secure (I'm not a fan of hand-sewing & used the ones that require a hammer)
  • Sewing machine & thread
  • Iron & ironing board
  • Scissors, rotary cutter, & cutting mat (rotary cutter & mat aren't necessary)
  • Water soluble pen, tailors chalk, or something that can write lightly on the wrong side of fabric without showing through.
  • Ruler
  • Medium/Large curved & traceable thing (I used a bowl) or compass
  • Chocolate <- Not exactly a material, but it sure makes crafting more enjoyable!


Instructions:

1. Cut your fabric and interfacing as listed above using scissors or a rotary cutter.

2. Use your curved object or compass and writing utensil to draw a curve that is wide enough for it to hit the sides of your card holder no more than 1" from a short edge of the wrong side of a body fabric piece (click on the picture for a closer view).  Place the right sides of both body pieces together and carefully cut both pieces along the curve you drew on the body piece.

3. Use the same curved object or compass to draw a curve on the short side of the wrong side (non-bumpy) side of interfacing and cut.  Attach the interfacing with the bumpy side against the wrong side of the outer body fabric per the interfacing manufacturer's instructions.

4. Fold the upper pocket fabric piece in half hotdog style (so it's 5"x2 1/8") with the right side facing out, press with the iron, then sew a straight line 1/8" from the folded edge.

5. Lay the upper pocket folded side up (toward the curve) on the right/correct side of the inner body fabric with the raw edges of the flap 2 1/8" from the bottom of the inner body fabric and pin in place.  Sew it on with a 3/8" seam allowance from the pocket's raw edge.

6. Lay the two body pieces right sides together and sew together with a 1/4" seam allowance from the edges, pivoting at the corners, sewing carefully around the curve, and leaving a 2" opening on one edge for turning inside out later.

7. Trim the corners, being careful not to cut into the actual stitching.  Cut small slits in toward the curve, again being careful not to cut into the actual stitching.

8. Gently turn the card holder inside out and poke out the corners (a mechanical pencil with the lead poked up inside the pencil rather than sticking out works great if you're really gentle).  Tuck in the unsewn edge to line up with the rest of the card holder and press with the iron.

9. Sew a straight line 1/8" from the bottom of the card holder (bottom of picture above).  I flipped the wallet over so the outside fabric was facing up when I sewed just because the bottom side of my fabric sometimes ends up a bit messy near the ends where I backstitch.

10. Knowing that the bottom of the card holder is going to fold up to be a pocket and the top curve will fold down (with allowance for the actual business cards and crease room) to be a flap, decide where you want your snap closure to be.  We are going to attach the bottom snap first that will be on the lower pocket.  Place the prong side of your snap ring prong down where you want it on the inside of the card holder.

11. Gently but firmly poke the prongs through the fabric.  Fold the bottom upward and make sure the prongs are all through.  You can use a pencil eraser to help.  Then lay the snap socket (the piece with the hole the the stud will snap into) on top of the prongs.  I got confused trying to follow the manufacturer's instructions about which side of the socket went up and which side went down but discovered there's only one side of the snap socket that will fit on top of the prongs.  :) Then, I used a little handy dandy "Easy Attacher" to help me accurately hammer the snap socket onto the snap ring prong.  The bottom part of the top of the Easy Attacher in this picture actually folds down so you can set the socket right in the hole and then you close the top to hammer, but I took a picture this way so you could see what's going on easier.  I did the hammering on top of a pile of fabric to muffle the sound a bit since I had a sleeping baby in the other room.

12. Cut a little piece of ribbon (I cut mine 2" long) for the key ring loop.  You can trim with pinking shears, fray check, or heat seal the ends of the ribbon if you wish.  Nobody will see the ends, but I heat sealed mine since I like fire and just feel better knowing the ends aren't fraying inside.  :)  Fold the bottom of the card holder up toward the inside like in the picture above so the crease is right where the bottom of the upper flap meets the body and the bottom of the card holder (which now becomes the top of the lower pocket) is 1/4" below the top of the upper pocket, and press with the iron to form a nice crease.  Fold your ribbon in half and pin it between the flap and the body on one of the sides with the folded edge sticking out enough to hold a key ring and the raw edges tucked in enough to get sewn in by a 1/8" seam allowance in the next step.

13. Carefully sew around the whole card holder with 1/8" seam allowance.  You may have to lift your presser foot up a bit to get the pocket edges under it.  Go slowly, especially as you sew over the opening that you used to turn the card holder inside out, the pockets, the ribbon, and the curve.

14. Now fold the top flap of the card holder down (with allowance for the actual business cards and crease room).  Place your finger on top of where you can feel the snap through the fabric.  Lay a snap ring prong with the prongs downward right on this spot and gently but firmly push through this top flap.

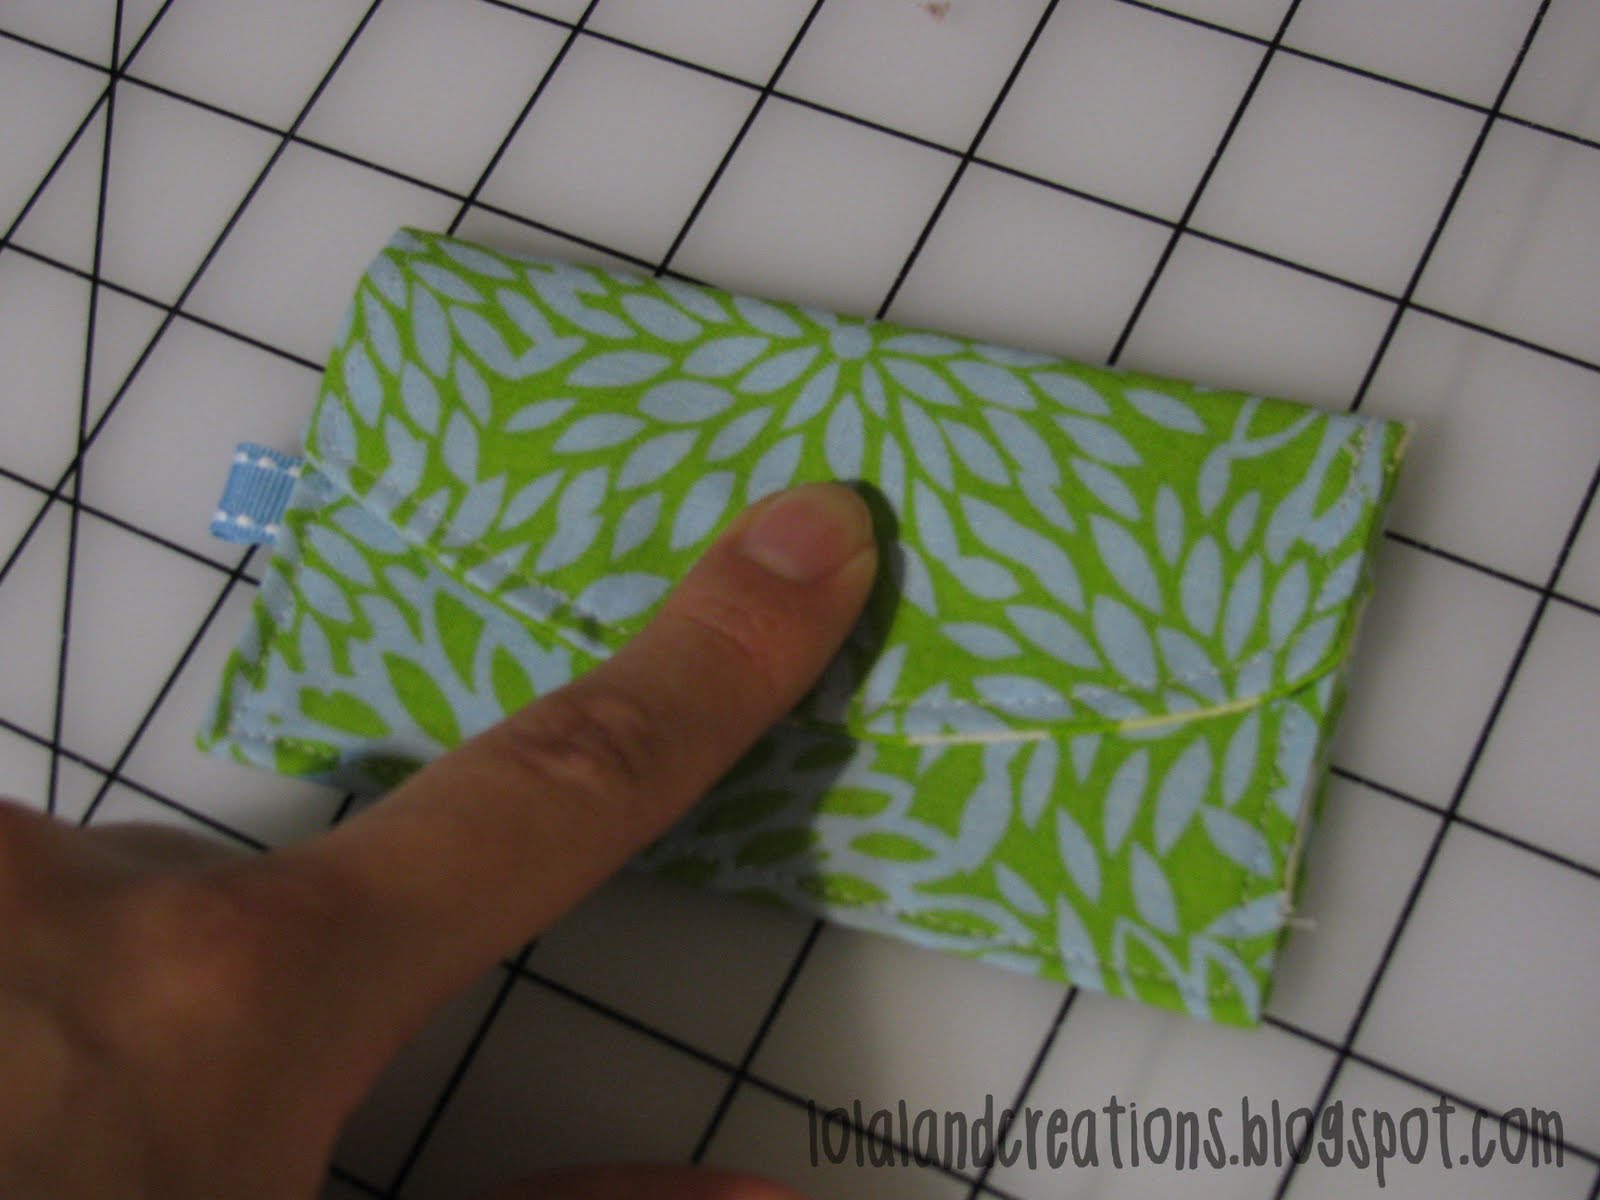
15. Lay your snap stud on top of the prongs and attach.  Again, I used my nifty little Easy Attacher.

16. Fold the top flap down, snap the card holder closed, and press the fold to make a nice crease.  Time to eat chocolate and celebrate! You now have a nice, simple business card holder!

The card holder has two pockets for organizing cards how you like them.  It can hold over 20 cards, yet remains super trim!

After I completed the card holder, I realized I should have put one of my new snazzy labels on the back. So I've decided to give this card holder away and make another one for myself.  I think I will also add another layer of interfacing for greater stiffness.

This card holder can be used for more than just business cards. You can put money (no coins), reward cards, credit cards, or ID cards in it, or you can gift it to someone as a reusable/multi-purposed gift card cozy of sorts.  Want to win it?  Fill out the form below:

***Giveaway closed.  Form has been removed.  See winner announcement here.

Monday, May 23, 2011

The Pixies Are Coming!

Maybe it's because my husband and I are reading Lord of The Rings together {That's right, we read out loud to each other.  :)  Judge us all you want; we readily confess our nerdiness.}, and I have elves on the mind.  Maybe it's because I adore tiny little persons and think anything that enhances tiny little cuteness is irresistible.  Or maybe it's because I never fully grew up and still require a bit of whimsy in my life.  But. I. can. not. stop. making. these. hats!


{Squeeeee!}  These little pixie hats make fabulous photography props, especially for newborns.  The long tail enhances the cuteness of baby's teeny tiny body without covering it up.  And what a fun hat for slightly older babies!  They are whimsical, unique, and imaginative.  Be forewarned, they may even elicit a smile from that grumpy person in the grocery store and beckon to baby-crazed grandmas everywhere.

This pixie goodness is coming soon to the LolaLand Creations Shop in three different stripe pattern choices and in two different yarn choices.  These fun pixie hats can be made from 100% acrylic yarn for more vibrant colors and a fuzzier look or in a 50% acrylic/50% cotton yarn for a more muted color palette and a cleaner look.  Both yarn options are super soft.  Here are a few more pictures.  I told you I couldn't stop!

Chunky Stripes in 100% acrylic yarn

Mixed Stripes in 100% acrylic yarn

Skinny Stripes in 50% acrylic/50% cotton yarn

Suggestions of descriptive names for the three different stripe patterns are welcome!  Wouldn't you love to see the name you came up with on this eye candy? Until then, you're stuck with the literal descriptions above.


post signature

Tuesday, May 17, 2011

Believe. Hope. Write.

'Infertility' - A word we prefer to ignore.  It's a seemingly intangible struggle to those of us who haven't found ourselves in the midst of it, but it is oh so very tangible to those living it.  As it is by definition a lengthy period of waiting, some folks who really do mean well and want to cheer their friends or family members up try to do so by glazing over the hurt and trying to rush past the grieving.  Let's face it:  It hurts to see a loved one hurt.  But when walking through a battle so intimately connected to every fiber of one's being as infertility is, what your friend needs is to be allowed to hurt and have others to walk through the hurt with her instead of pushing her to get over it quickly.  Mourn with those who mourn and rejoice with those who rejoice.

How then do we encourage our loved ones struggling with infertility while still allowing them to feel and acknowledging their hurt?  We let them know they are loved and cared for over and over and over and over and over and over and over again.  In infertility, there is a deep root of fear of unworthiness, a questioning of value, and sometimes a feeling of guilt.  You can't force a person to feel loved, but you can gently remind her that she is loved and hope and pray that it becomes encouraging truth to her heart.  What a person who is struggling with infertility wants from you is your presence - not magical words from your lips that you think might make things all better.  She is looking for a friend who is going to be there for the long haul - a friend who is patient with her as she wrestles with the same thing(s) again and again.

If you are a Christ follower, remind your friend that she is loved by God so much that He gave His only Child for her and that God really is empathetic.  While He allows suffering, He allows it because He has our overall good and joy in the long haul and big picture in mind that we can often only see in hindsight. There will come a day when there are no more tears or suffering and that should remind us that the heart of God really is for us and not against us, even when it seems so hard to believe.

One practical expression of love toward a friend with infertility is a journal.  In it, she can be 100% honest.  It is a safe place to work through the hurt, acknowledge all her fears, and wrestle through all her struggles.  There is no judgment in its pages.  The only person reading it thoroughly understands every pained word, every joyful word, and every hopeful word in it, because she is the same person writing in it.  You can encourage her to pen in her journal what she is not yet ready to share with others.  Remind her that the journal is there for the long haul and so are you.


With the revenue acquired from April's sales at LolaLand Creations, I was able to purchase a stack of simple composition notebooks to give to the Hopeful Hearts Ministry.  They turned the totally drab:


Into totally fab:

Hopeful Hearts will be giving these journals out in my community, but this is a heartfelt handmade craft idea that you can make yourself to bless someone you know journeying through infertility.  Believe.  Hope.  Write.


post signature

Monday, May 16, 2011

Creative Extension

As a work-at-home-mom {WAHM} and human in general, I find it easy to get trapped in a mundane existence.  Everyday life is filled with loads of laundry, emails, grocery shopping, random errands, cooking, cleaning, and more.  Sometimes I need a little refreshment to remember that these little tasks are gifts and that the world extends beyond me.  So I started LolaLand Creations not only as a way to feed my creative juices and celebrate the WONDER found in the seemingly ordinary everyday life but to reach out and inspire others to do the same.

Creating leads me to marvel at how small individual pieces can come together to form a beautiful big picture.  It reminds me that patience and diligence, can bring about very worthwhile results.  It wells up gratitude in me and helps me to view the world with an appreciative eye for the grandeur in the simple.  Mostly, it teaches me about my Creator.

When you behold a LolaLand Creations creation, I hope it stirs joy deep inside of you.  May a blanket for your little one or a friend's little one remind you of your happy childhood memories.  Let it remind you to be grateful for the simple provisions in life like warmth when it's needed.  I hope that a fun burp cloth reminds you that there are many blessings that come with even the messy things in life.  May a flower headband evoke appreciation for natural beauty and beckon you toward gentleness with the delicate things in life.

The LolaLand Creations Blog is really just an extension of the LolaLand Creations company.  It's a place to give words to my creations - to share their story - to share my story.  Here, you will find my creations' stories, things that fuel my creativity, small moments of big joy, and maybe even an occasional giveaway or two.  :)

Please, join the conversation here in LolaLand!  Comments are encouraged and emails are welcome at lola[at]lolalandcreations[dot]com.  I will also be accepting guest posts that abide in the purpose of this blog.


post signature